
In this comprehensive guide, we will walk you through the various methods on how to take a screenshot in Microsoft Windows like a seasoned pro. Screenshots are a fundamental part of modern computing, whether you need to capture a funny meme, save important information, or troubleshoot technical issues. By the end of this article, you’ll be equipped with the knowledge to effortlessly capture and manage screenshots, making your Windows experience even more productive.
Table of Contents
- Introduction
- Method 1: Using the Print Screen Key (PrtScn)
- Method 2: Snipping Tool
- Method 3: Snip & Sketch
- Method 4: Using the Snip & Sketch Shortcut
- Method 5: Snipping with the Snip & Sketch App
- Method 6: Windows + Shift + S Shortcut
- Method 7: Using the Windows + Shift + S Shortcut with Snip & Sketch
- Method 8: Windows + Print Screen Key
- Method 9: Using the Windows + Print Screen Key with Snip & Sketch
- Method 10: Alt + Print Screen Key
- Method 11: Using the Snipping Tool with Delay
- Method 12: Using the Snip & Sketch App with Delay
- Method 13: Taking Screenshots with Game Bar
- Method 14: Screenshotting in Windows 10 Xbox App
- Method 15: Third-Party Software
- Method 16: Taking Screenshots in Windows Tablets and Touch Devices
- Managing Your Screenshots
- Conclusion
Introduction
Before we dive into the multitude of methods to capture screenshots in Windows, it’s important to understand the need for these tools and techniques. Screenshots serve various purposes, such as creating documentation, sharing information, or simply preserving moments from your digital experience.
16 Methods on How to Take a Screenshot in Microsoft Windows
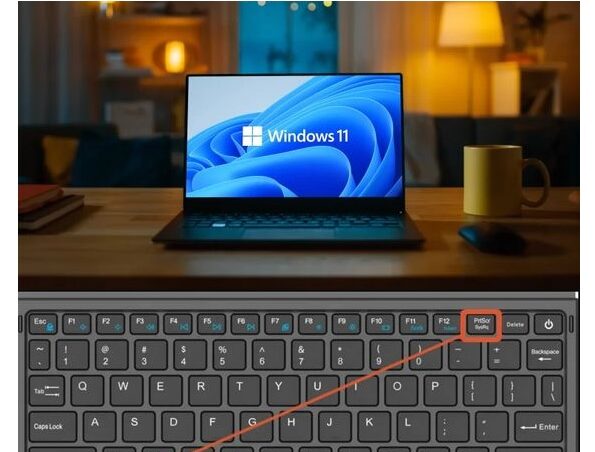
Method 1: Using the Print Screen Key (PrtScn)
One of the most straightforward ways to capture a screenshot in Windows is by using the Print Screen key, often labeled as “PrtScn.” When you press this key, it captures the entire screen and stores it in your clipboard, ready to be pasted into an image editing program or document.
Method 2: Snipping Tool
The Snipping Tool is a built-in Windows application that allows for precise screenshot selection. This tool lets you capture specific areas of your screen, making it perfect for highlighting important details in your screenshots.
Method 3: Snip & Sketch
Snip & Sketch is another native Windows application that combines the convenience of the Snipping Tool with annotation capabilities. It enables you to capture, edit, and mark up your screenshots, adding a layer of professionalism to your work.
Method 4: Using the Snip & Sketch Shortcut
To streamline your workflow, consider using the Snip & Sketch shortcut by pressing Windows + Shift + S. This instantly opens the Snip & Sketch tool, allowing you to select and annotate your screenshot with ease.
Method 5: Snipping with the Snip & Sketch App
For those who prefer a dedicated app, Snip & Sketch offers a user-friendly interface. It simplifies the process of capturing and editing screenshots, making it an excellent choice for both beginners and professionals.
Method 6: Windows + Shift + S Shortcut
Another quick method for capturing screenshots is to press Windows + Shift + S. This triggers the Snip & Sketch tool, allowing you to select the desired area for your screenshot, which is then automatically copied to your clipboard.
Method 7: Using the Windows + Shift + S Shortcut with Snip & Sketch
By combining the Windows + Shift + S shortcut with Snip & Sketch, you can rapidly capture, annotate, and save screenshots. This efficient approach minimizes the time spent on the entire process.
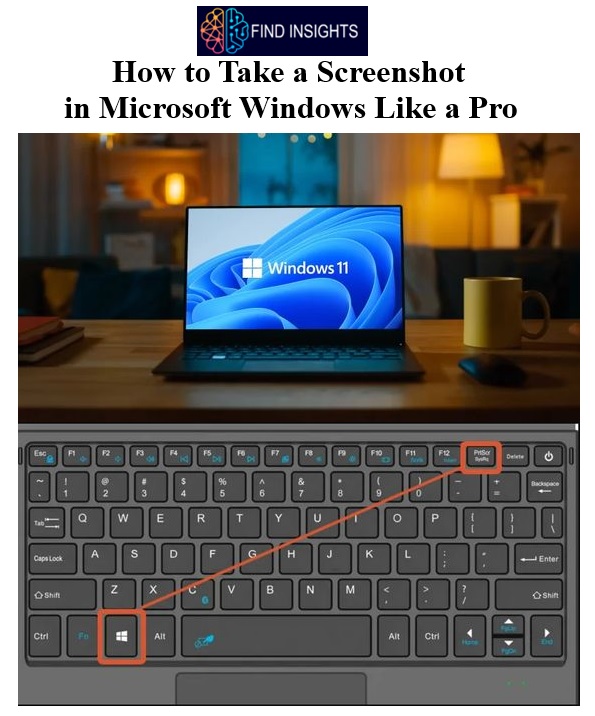
Method 8: Windows + Print Screen Key
To take a screenshot and save it directly as an image file, press the Windows + Print Screen key combination. This method automatically stores the screenshot in the “Screenshots” folder within your “Pictures” library.
Method 9: Using the Windows + Print Screen Key with Snip & Sketch
For advanced users, combining the Windows + Print Screen key with Snip & Sketch provides the flexibility to capture and edit screenshots swiftly, resulting in high-quality images ready for use.
Method 10: Alt + Print Screen Key
If you need to capture the active window only, press Alt + Print Screen. This method ensures that you capture precisely what you need, without any unnecessary clutter.
Method 11: Using the Snipping Tool with Delay
The Snipping Tool also allows for delayed screenshot capture. This feature can be useful when you need to capture menus or tooltips that disappear when you click away.
Method 12: Using the Snip & Sketch App with Delay
Snip & Sketch offers a similar delayed capture feature, enhancing your ability to capture transient on-screen elements with ease.
Method 13: Taking Screenshots with Game Bar
Windows 10 comes equipped with a Game Bar that includes screenshot functionality. To access it, press Windows + G while in a game or any fullscreen application.
Method 14: Screenshotting in Windows 10 Xbox App
If you’re a gamer, the Windows 10 Xbox app provides an intuitive way to capture screenshots and record gameplay moments effortlessly.
Method 15: Third-Party Software
While Windows offers an array of built-in screenshot tools, you can explore third-party software options to further enhance your screenshot capabilities, such as Snagit or Greenshot.
Method 16: Taking Screenshots in Windows Tablets and Touch Devices
For users on Windows tablets and touch-enabled devices, the process of taking screenshots may vary slightly, but it remains straightforward.
Managing Your Screenshots
Now that you’ve mastered various methods of taking screenshots in Windows, it’s essential to learn how to organize and manage them effectively. Organized screenshots will save you time and help you find the right image when you need it.
Conclusion
In this comprehensive guide, we’ve explored a multitude of methods to take screenshots in Microsoft Windows like a pro. Whether you’re a casual user or a seasoned professional, these techniques will enable you to capture, annotate, and manage your screenshots efficiently. With the right knowledge and tools at your disposal, you’ll be well-equipped to handle any screenshot-related task with confidence.
LIKE WHAT YOU’RE READING?
CHECK OUT SOME OF OUR OTHER GREAT CONTENT HERE:
- HOW TO DEACTIVATE AN INSTAGRAM ACCOUNT?(STEP BY STEP GUIDE)
- HOW TO MAINTAIN HEALTHY LIFESTYLE?
- 10 TIPS ON HEALTHY LIFESTYLE
- BEST MOTIVATIONAL QUOTE FOR SUCCESS IN LIFE
- HOW TO REDUCE FUEL CONSUMPTION?
- LEARN THE ART OF TIME MANAGEMENT
- DEVELOPING EMOTIONAL INTELLIGENCE
- LEARN PROBLEM SOLVING SKILLS
- BEST BOOKS ABOUT SWAMI VIVEKANANDA
- 20 BEST QUOTES FOR A HEALTHY LIFESTYLE
- WHAT ARE BENEFITS OF RUNNING?
- WHAT ARE THE BENEFITS OF GREEN TEA?
- BENEFITS OF FENUGREEK FOR WOMEN: A COMPREHENSIVE GUIDE